#PageList1 {text-align: center}
Showing posts with label bake. Show all posts

04 May 2020

My Monday baking: Little buns


Are you struggling with activities to do yourself plus kids? Well what about baking? I know it may not be easier to do with two little guys, but depending the recipes  you are following it can be manageable.

I found this buns recipe online, and it is such an easy one to follow, only two ingredients, not proofing needed and its easy for my little guys to help out... both baking and eating!

Ingredients:

Yogurt
self-raising flour
salt

You just need to keep the proportion 1cup of yogurt to 1 and 1/2 cup of flour and a pinch of salt.... and mix!


Then shape a round ball of dough over a floured counter:


And divide the balls into smaller round dough balls...:


Take it to the oven 10 min 200C:


And that's about it, you'll have little buns ready!


Tasty and quick recipe to make buns ever!


the kids totally loved these, we did eat all the buns!


Hope this inspires you to bake with your little ones and get them occupied for a few min!

28 January 2020

Our first birthday party! Space Party!

It has been a while since my last post! And this new post will be very different from my last one. I shared a very personal side of my life... There is so much that I need to share, but bot today.
Today I will be sharing a brighter and lighter side of these past months. It is always a pretty busy holiday season for us,  besides Christmas we have two birthdays to celebrate... That's what happens when both your children are born around Christmas time, one just before and other after Christmas day...!

And today I will be writing about how we planed my oldest birthday party, and how we decided to celebrate birthdays which happen during the Christmas holiday. I do know that there are many blog posts sharing fantastic birthday parties, with extraordinary decorations! And yes, if I had a never ending budget I would love to offer one of those parties to my 6 year old boy... However our budget is limited, and we have to keep our feet grounded and not go crazy -  and  I only managed to do this because of my well grounded partner... I am very addicted to Pinterest and it was incredibly hard for me to keep this party within reasonable, and more practical limits. But it is difficult isn't it? As a parent you want to offer your children all their dreams! I am thinking about this party for a very long time,  my plans concerning the decorations, children's games and entertainments  as well  our party food are thought  far in advance  -over 6 months - so  we would not be stressing about it later. I used to take a quick pick at all sale items in stores as Hobby craft to look for bargains. All the decorations were made by me as well most baking. So the amount of work to do closer to the event had to be planned carefully and with a steady timeline so I would be doing things  with enough time. It helps that my partner was the one grounding me to earth, and reminding me about the time, so I would not loose myself!

But one step at the time! One of my goals was to have both of my children realise that even with the Christmas season their birthdays were important, special and different from our Christmas celebrations. As most children, they were quite excited about Santa Claus' visit. We decorated our home for Christmas and both kiddos helped us out. So, on their birthdays I made a bunting and we had extra large balloons with their age, to mark their birthdays. These days are special, its a celebrations of their birth, of the time they are in our lives and they are treasured. Even if in the midst of  Christmas season, which we all love, these days are so much more cherished!

three


And... back to my my oldest party! We also wanted to offer him a birthday party with all his little friends from school. It would be quite impossible to have a birthday during the holidays, so we planned his birthday party to  happen once school started, during the weekend. Since his birthday is happening during winter time we knew that the party would be happening indoors, ready for any weather. So, we had to rent out a large room with enough space for the children to run freely and able to cope with a large bouncy castle! We searched online for this and rented a large community room close to our home. We did this 3 months prior to the party due date, and we had to move his birthday celebration for a Sunday since our preferred Saturday date was already taken... So lesson learned renting the room have to happen with more time to avoid any disappointments...
His birthday party happened on a Sunday, during the first weekend after school resumed. The invitations were distributed during the last week before Christmas holidays so that the children's parents could rsvp with time. In the end my oldest party had 20 of his little friends attending!


Our party was space thematic, as space and the planets are subjects that our eldest is eager to learn and talk about. Our invitations were made by me, I used Canva for this. And all the little planets and stars that were featuring in the invitation were also used to make a little bunting to hang in the room, by an opening from where the food would be later available. Apologies for the photos as I was so busy on the day I had no time to take any good photos! 


The bouncy castle that we also rented was coordinating with our theme, it featured a few aliens and rocket ships!

I planned for a 2h party, that started from 14h30 until 16h30. I also draw a schedule of the party that I discussed with my partner so we both had a rough idea of how the party should happen. The first 30 to 45 minutes we figured that the kids would be entertained just by jumping and bouncing around! I  planned  for three games to happen and for the children to have enough free play as well - basically having time to play with the bouncy castle. Having a bouncy castle takes care for the kids never ending energy,  and its the centre of all the children attentions, they are immediately drawn to it! So after decreasing a bit of energy with the bouncing castle I started the scheduled games that I had prepared. The first one was my 'Moon rock hunt'.

Moon Rock Hunt 
This was an adaptation of the well know 'Treasure hunt'. I made 20 moon rocks, basically  paper balls wrapped in aluminium paper and hid them around the room. I made 20 moon rocks altogether,  5 yellow moon rocks, 5 green moon rocks and 5 blue rocks (see below).

moon rocks


Previously, whilst the kids were arriving, I gave them 'Space cadets' badges that I also made with Canva, so that the kids were in different teams, yellow, green and blue. 


The blue team should search for yellow moon rocks, green team searches green moon rocks and so on. The general idea behind was to make the search an effort to foster team work and to make it a little bit more difficult. They should be searching for specific moon rocks. I also made some signs that spread oround the room pointing the children to the spots where the moon rocks would be. If planning this seamed easy, practically the minute the kids realised that there were teams, they wanted to be in specific teams! 'I want to be on the blue team'... 'I want to be on x's team'. The minute I started to listen to this I got a little bit panicky! I immediately dropped the teams ideas and quickly said: 'no worries children! If you want to search with x, do it, and search for the colour you want'. Immediately the kids started to run all around the room  searching for the moon rocks! That was the main goal in the end, having them running around  the room actively searching! Not soon after I was surrounded by my many rocks! I quickly counted and there  still two rocks missing! Quickly shouted, 'Kids only two yellow rocks missing! Keep searching!' And they kept searching the room! After finding all the moon rocks there were a few sad voices 'I didn't find any rock' that I had to dispel, 'Its ok, this was a team effort! You were looking for x colour and your team found all of them! There are more games to play, don't be sad.'

Note: with 20 children this game took about 10', with the kids finding 20 moon rocks.

And then its time for my second planned game, 'Land the rocket'!

Land the Rocket 
Land the Rocket is an adaptation of  'pin the tale on the donkey'. I made the game myself reusing old cardboard boxes. I wrapped in space themed wrapping paper a large piece of cardboard. 


I printed a large moon from Canva, as same as the moons that  featuring in the invitations and the paper space bunting and glued in the centre of the cardboard. I then printed about 30 small rocket ships from canva and cut them, attached double sided tape and placed them in an envelope and stick it on a cardboard frame. And this is a picture of the end result, after the kids landed all their rockets!


Note: With 20 children this game took about 30' to finish. Some children were able to land a second rocket.

After this game it was about 16h, and it was time for snacks. The children quickly ate, and after another round with the children freely bouncing in the bouncing castle it was time for the last game, pass the space parcel.

Pass the space parcel
 This was simply the 'pass the parcel game', where the parcel was wrapped in a space themed paper. I wrapped small bags of sweets in wrapping paper, added more bags of sweets and wrapped again repeating the process over and over again. I did this twice, making two large parcels. This was the game that was more difficult for me to manage... I had to pay attention to the children that are very slow to pass the parcel as pay attention to make sure that  the song stops at a time that there's  new kids holding the parcels! Every child has to have a turn at opening the parcel.... And I had to manage two parcels at the same time so that the game would not take ages to end.... I was lucky that a mum that stayed at the party was helping me out at this, she could see that I was having difficulties! I let a kid  open a parcel twice which should be fine if you have loads of turns at 'pass the parcel', .... but we did not have so many sweets to let all the kids have second turns.  All it was fine in the end...The children also step in and started to say who already had a turn!

Note: With 20 children and two parcels, this game took about 20'.

And after this game it was cake time! It was the last event and with this we are pretty much at the end of the party! 

And at this point we barely had time to sing 'Happy birthday' and have the birthday cake! My oldest wanted a chocolate cake, which was great as the chocolate icing would be great as more  space than a featuring little white chocolate stars....


And we are pretty much at the end of the party....!
I was really scared about this first party to be honest... Will the kids have fun? Will they get bored? What can I do? But just the bouncing castle would have been enough... Just bouncing around is great fun for these little guys!
We also handed party favours when the children where leaving the party, a paper bag with light in the dark stars, a space pencil and a space rubber! 


07 October 2019

My Monday baking: Black Forest Gateau


Hello!

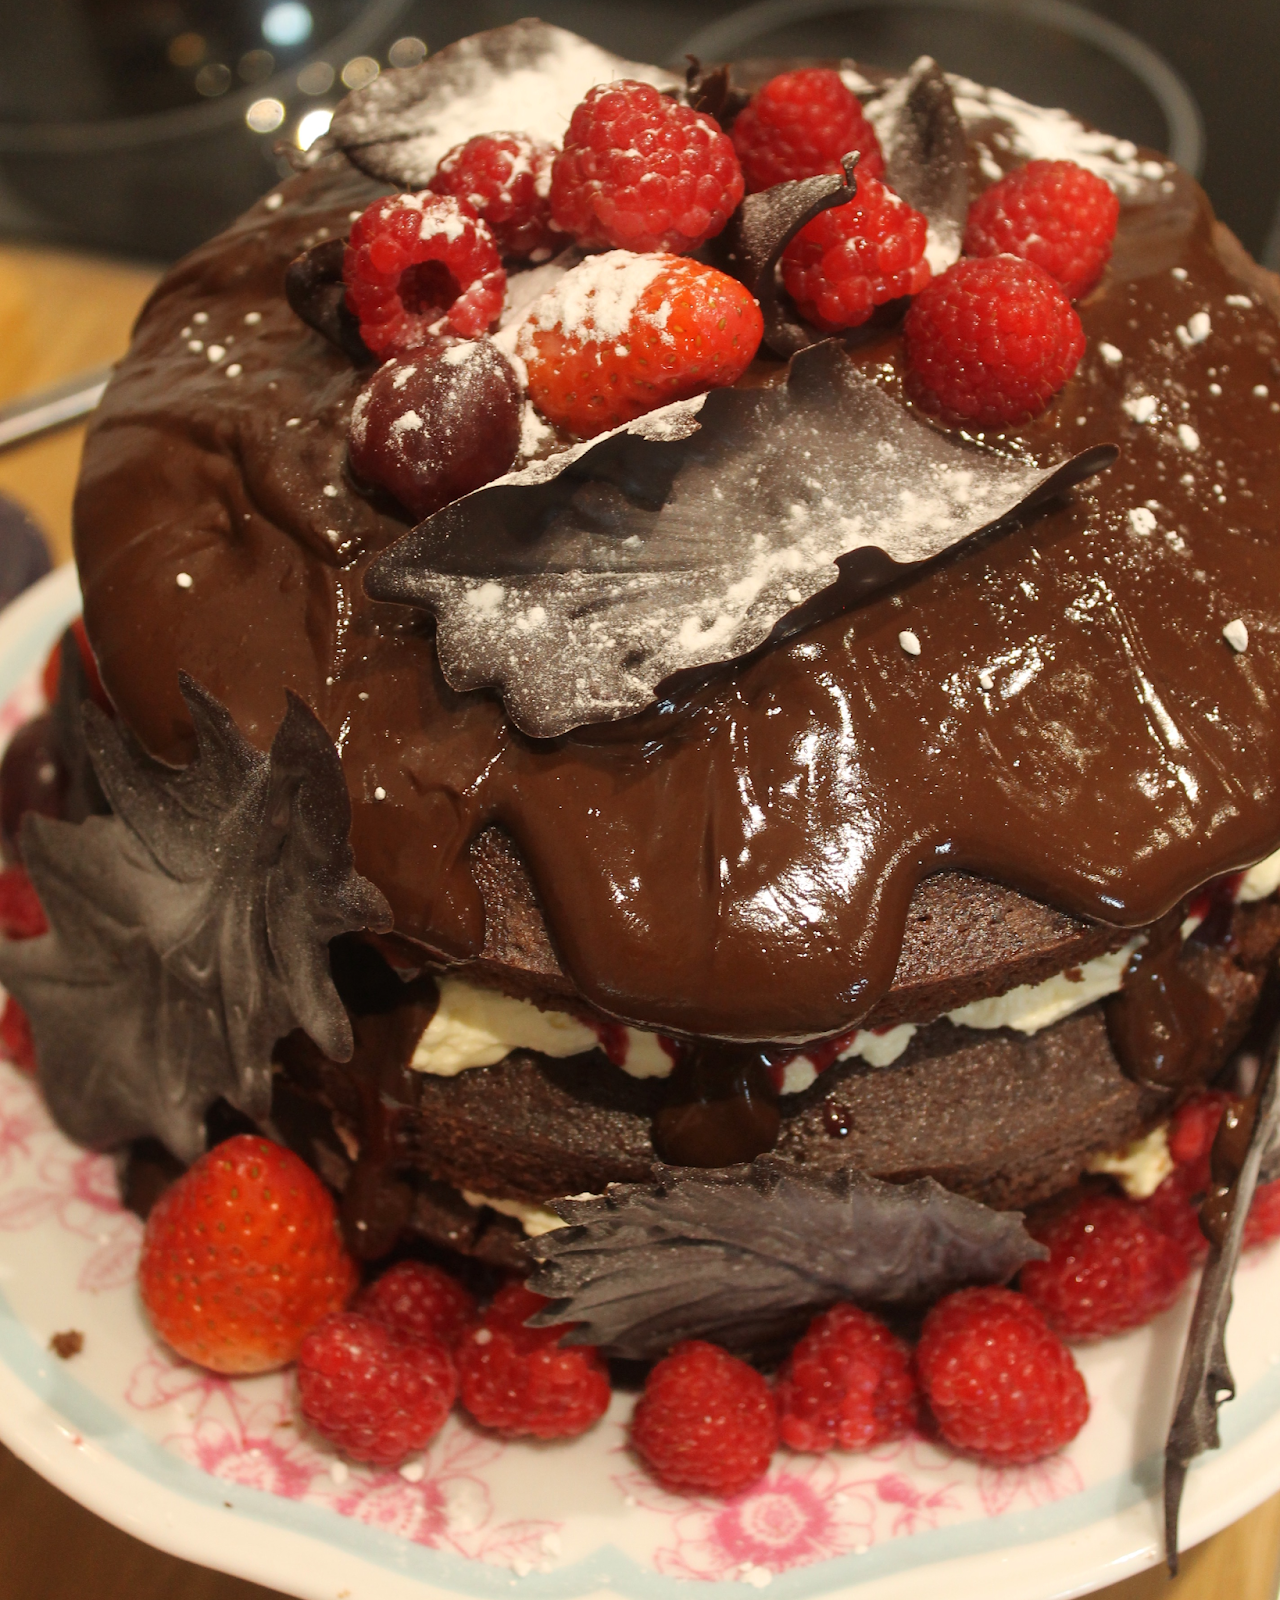
So it is my husband's birthday, and he is reaching a milestone, turning 40! As this is a special birthday to celebrate he had a special request for his birthday cake, a Black Forest gateau... I already attempted to bake a Black Forest two years ago, and found a recipe on BBC Good Food that worked really well.  I went a little overboard now, as this is a 40th birthday I decided that the cake should have more layers, 1 for each decade! So we ended  with a very tall cake, with four tiers.... The very rest I kept the same, just added more details on the presentation, as my chocolate leaves. I really enjoy experimenting new techniques, and this time around I attempted at drawing with melted chocolate. These were the ones that were a little bit more troublesome for me to make, as it was my very first attempt at moulding chocolate, so I had to wait a bit until I had the right texture to mould and then created the leave shape. Before I did googled how to make chocolate leaves, and found many tutorials available... I didn't quite follow  any specifically, I just took several tips and then made my own leaves. Many tutorials use actual leaves as moulds, and others draw the leaves on paper using forks. Since I didn't have any leaves handy at home, or was feeling like going leaf hunting outside, I decided to free draw my chocolate leaves on aluminium paper, and use the flexibility of the aluminum foil paper to mould the leave, and then just put in on them the fridge... In the end I had these little chocolate leaves:


For me, the the greatest difficulty of the Black Forest is the assembly. You have to prepare before hand the cherry jammy, and the double cream. So, after the cakes are cold, they are layered with double cream and cherry jammy, ending with final spread of chocolate. 

Layering 4 tiers for me was difficult. I was feeling like I would probably  end up with a Pizza tower... So getting the right balance and making sure that the layers were even for me was very tricky. I started by considering my chocolate cake sponges shape, I had two sponges that were uneven, and had to balance the shapes between them. If the bottom cake was little bit higher in the right, I made sure that the second cake layer was a little bit higher on their left side, so they would balance each other. I was lucky, as I had two chocolate sponges that were even, and two chocolate sponges uneven but did balance each other. After layering chocolate sponges, cream and jammy cherry and the chocolate spread I had this little cake tower:


I left it as you can see, as I was enjoying this perfect shapes and the handmade touch. And I was still missing  chocolate leaves and the fruit. The final step was all about decoration. I had some cherries that haven't used in the jammy, strawberries and raspberries to use in the cake.
To attach the chocolate leaves to the cake I use the the leftover of my chocolate spread.  


And a final touch of powder sugar and we're done! This picture does show my fears of having a pizza tower for cake... However I did manage to get that fixed! Just added more fruit!
I used a lot of red fruits,  by savouring this chocolate cake and these berries, you enjoy a lovely contrast between the strong chocolate flavour and the red fruits. 


And it's finish, a very yummy Black Forest Gateau ready to go to the birthday celebration!

17 April 2019

My Monday Baking: Sweet Buns "Arrufadas de Coimbra"


Hello you!

It has been a long time since I last posted my baking adventures... Since Easter is arriving, I wanted to try some sweet buns recipes. So I ventured and I attempted a new recipe, Coimbra's sweet buns. These sweet buns are based on a Portuguese recipe, their original name are "Arrufadas de Coimbra" and are very typical for Easter. It has been a long time since I last had "arrufadas",  these are really hard to come by in the U.K. (actually,  impossible!). And since I had no idea how to bake these, I did what anyone does, googled a recipe and .... lets bake!

I found a recipe at Doces Regionais ,  and adapted it. I did not used the original measurements that that site suggested. I felt that using 2000g of flour would be a bit too much! Considering that most probably I would find myself having a failed first attempt (which I actually did), I did not wanted to waste so much. Also, if you feel like trying this receipt, bear in mind that it will take a long time to actually bake these buns, as they have to be proofed for a whole night. 

These are the ingredients I used:
650 g flour
4 eggs
20g fresh yeast
100g butter
165g caster sugar
salt

And a picture of my sweet buns looks! Yum!


And the method....:

Mix the flour, sugar and a bit of salt.  I also had to activate the yeast before adding it to the flour mixture. I had to use warm water,  sugar and mix it with the yeast.  Then, I had to wait until there is foam on top of the liquid mixture and that's it, my yeast is active! Then mix it with the previously prepared flour mixture, add the melted butter, eggs and mix it for 10 min.

Now it's time for the troublesome kneading stage... The dough is very sticky, so kneading it was very difficult. I followed this video, which had some good pointers:


After the dough is kneaded, I left it to proof during the night.  I covered the dough with cling film in a large bowl and waited for the morning to arrive. Yes, it is a very long proofing stage.
But my dough more than doubled the size...!
After the proofing stage I divided the dough in eight small dough balls and placed them in an oven tray and proofed for another 30min. Afterwards, I brushed the buns with egg yolk and sprinkled with both icing and caster sugar. I preheated the oven to 200C, and placed my sweet buns in the oven. After 30min, your sweet buns are ready! Yummy sweet buns ready for breakfast!


I am thoroughly proud of how these sweet buns turned out. Bear in mind  though, that this is a second attempt...


In a first attempt I did not used fresh yeast but regular dry yeast. It did not work for me, the dough did not rise once proofed. Heres a photo of my first attempt at these sweet buns and the second more successful bash:


The difference between the buns texture is pretty obvious... My first attempt resulted in very hard buns. Not fluffy and tasty as my second try. I am not sure what went wrong with me using the dry yeast, but I could see that during my kneading stage that the dough was not changing and becoming elastic, the gluten was not activated. It worked with the fresh yeast though!

I will be defenitely baking these again as these are really tasty yummy! And both kidos loved them... So kids' approved sweet buns!
Did you try any new recipes for Easter?

23 February 2016

Baking my very first swiss roll with my toddler!


Mondays are my most exhausting week days. Mondays are also my favourite day. 
On Mondays I stay at home with my little one.... Its just me and him. Some Mondays go better than others... Thats also means that on some Mondays  I am more imaginative than others.
It can be difficult to keep your little one occupied, and at the same time keeping up with all the things you have to do. It does mean that you have to do the things considering that you have an extra hand to help you out.... That extra help some times can be extremely helpful....

After all chores done, which as you can imagine were so very easily done between the two of us, we managed to get some free time to do some baking.... 

You could think that baking would not be an easy thing to do with a toddler around... Theres extra cleaning to do (plus the extra bit of your helpful hand), and its baking.... But, 

Baking means that we are both occupied. And we get a sweet thing to bite on later! And it can also be so much fun!
The little guy chose the recipe that we would be baking, (it was really fun seeing him flipping through the recipe book without ripping the pages...), and he decided that we would be baking a swiss roll:


It was my very first attempt to bake this, so I had no idea how this would work out.... I read several times the recipe at first and it seemed simple to follow up. I was also lucky because I had all the ingredients around.

And we started to prepare all we needed! One thing that I have noticed, he really likes to help me out ... He is quite good following up on what I say if he feels that is contributing somehow. Although I also noticed that there are some things that he prefers doing than others...

But when it comes to baking, he does have some fun with me, baking together...:


Some easy tasks he can do, bringing the ingredients to the counter top, and then  adding sugar, flour... In the beginning he was a bit scared with the sound from the cake mixer, but then he wanted to see everything.


This recipe does not need much time in the oven, just 10 min or less, which is quite good when you have an anxious toddler waiting for it!

In the meantime we were spreading the sugar for the roll...:


He was quite good at spreading the sugar.... So much fun,.... And so much cleaning to do afterwards... But hey, theres a swiss roll on the oven so, its all worth it!

And he was also good spreading the strawberry jam!


The rolling was the tricky part. It didn't go that well, we didn't achieve the rolling look as the book.... But it was quite tasty!
And this is it, the swiss roll!


I have to re-watch some of Mary Berry's tips on rolling.... I also failed to use the right form size, so my roll  was longer...

But I do enjoy baking with my little guy. And so does he. When we are both busy baking, that means that he doesn't  get to feel bored, or unsure with what he should be doing. And so am I. 
I get the sense that Mondays when we are both entertained things run much more smoothly. When he gets bored tantrums show up. Seems quite logic right?  But no so much when you have a screaming toddler around and you don't know what else to do... And trust me, the extra cleaning its worth the lack of tantrums.... at least for me....!

Going for another bite now...

21 August 2015

Our Saturday!

I am so pleased with our little weekend routine! We now have an established weekend routine... Our Saturday mornings start with some baking... Followed by a delicious breakfast, fruit of our previous hard work! We then head out to a walk by the near park... Feed the swans and the ducks is a mandatory stop... and then we walk and enjoy the sightseeing, which is just beautiful. River Itchen is just stunning really. On Sunday we go to the city centre and enjoy the local playground. This routine is working so well for us, we are able to have such enjoyable family time! So, lets describe our Saturday then...:

We started by baking pancakes...! Again the little one had so much fun helping me out! 

baby baking


pancakes dough bake

He had a blast using the whisk! The end result was just delicious....:

pancakes blueberries

pancakes latte

Just yummie!

I already posted a while back a picture of little one and his walking cow... He absolutely loves to walk the little cow! He is so happy and cute while at it... Hw waves bey bey to every walker by, and they just laugh out loud and wave back at him... We spent hours just walking the little cow...:


We did somehow managed to draw his attention to the river and swans... And then we fed the swans, he loved it too!


How was your Saturday?


I am linking up:
The Little Life of Ickle Pickle
Country Kids from Coombe Mill Family Farm Holidays Cornwall 
Related Posts Plugin for WordPress, Blogger...