#PageList1 {text-align: center}
Showing posts with label DIY. Show all posts

15 February 2021

My Monday Making: Valentine's decorations


Hello! Monday is always such a difficult day for me... Its the first day of the week, where I have to prepare for a hard working week as also finishing up some chores left from the weekend. And this weekend was a special one, as we celebrated Valentine's! I decided that this valentine's would be a family event, where we would celebrate the love we feel for each other. So I tried to make it special for everyone, and make it special for the little kiddos particularly. Once again I went all out with decorations and a lot of baking! The kiddoes do enjoy it, and... I think they are starting to expect it, as they are becoming a biiitttt demanding... lol! More on that later....

Our lunch was special , and I baked a hear dessert for it. I followed this recipe here, for a layered Brownie Heart Dessert.

I started by baking two heart shaped brownies:


This is what they looked after baked, quite cute, when removing the brownie from the foil goes well! My second brownie was not that good looking....


I then made the strawberry cream... Look at those gorgeous colours!


And spread it over the brownie.


Then its all about strawberries!


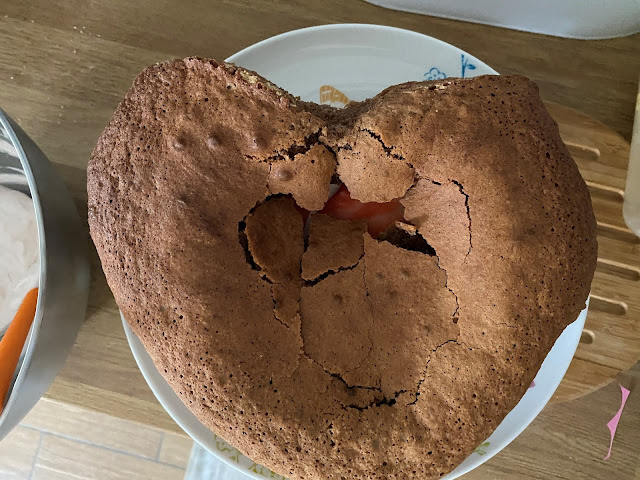
And here goes the second brownie. As you can see it fell apart, but I was able to cover the hole with strawberry cream.


 and it looked good ... and very tasty in the end:


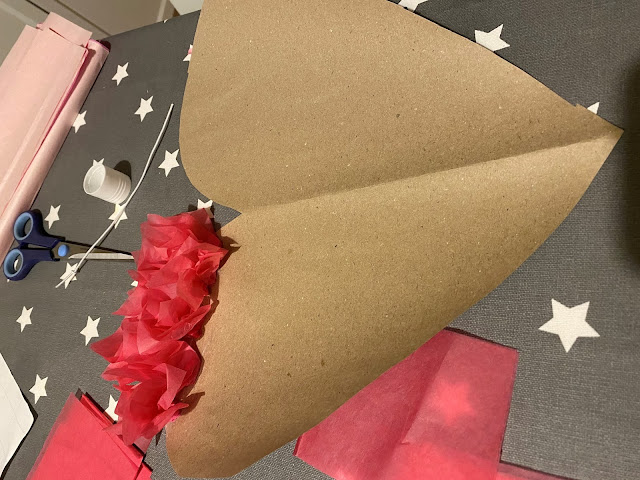
Making the decorations was the fun part. I made a lot of heart banners and also a big heart to hang. For this I used my stash of tissue paper I had. I used different tones of pink to make an Ombre effect. Kiddos started by helping me, but then got bored!


I began by cutting squares of tissue paper, and glue with a regular glue stick.  I chose to use the darker pink tones first, and then ended up with the lighter pink shade.


The brown paper I am using is the rolls of wrapping paper I have around. I am always saving paper for this little experiments. Everything can have a second, third and fourth lives! I also used this paper to wrap the Valentines gifts. I did forget to take pictures! Next time I will remember to take some...

And this is how the heart ended up:


I cut a lot of little hearts to make the bunting. I made 3d heart bunting for this, so very easy to do! I will later share a tutorial. Its does take a lot of hearts to cut out, but that can be a task that you can share with your little guys!


I also made a banner saying 'Be my Valentine'.... And little fan! yes, I have a lot of pink paper around... Not so much now as I used a lot of pink for Valentine's!


And for snacks I also made some cupcakes and merengue... Cupcake toppers were obligatory! 


My oldest when saw the cupcakes asked 'Are this valentine's cupcakes?'...  I answered, 'Yes, honey, they are!' ... and he replies: 'So why are they not heart shaped??' LOL! Very demanding little fellow....!

I hope you enjoyed a lovely Valentine!
xx


07 February 2021

My Monday Making: A bird automata!


Hello everyone! I hope this post finds everyone in good health, both mental as physical... and that everyone is keeping themselves safe. Uow, what crazy times we are living, never ever have I imagined that in 2021 posts of mine would start this way. But this is still our covid's reality. 

It has been a long time since I have last published a post about our little makings around the house. Have to say that with lockdown, I have never been so busy and lacking time to do anything. My sewing machine is closed up in a cupboard. And, being completely honest is not as I have the right mind frame be sewing properly . And since I have little people to keep entertained, any makings have to involve tiny hands, and be fun!

I have come across an amazing whale automata when browsing the internet for ideas:


Yes, this at some point will be something for us to make, but.... not in the foreseeable future!
I had to search for something more feasible for us to make. Much easier to do as well! So  more browsing and I found this tutorial at a great website for automata, Rob Ives .

The tutorial I chose to use was this one, for a cork bird. So .... we started to make this little guy!  We begun by gathering all the materials. We have a lot, and I mean a lot of corks in our home (not sure why... do we have someone who really loves red wine??). As I am always printing articles and so on, we have a lot of paper clips. We just had more difficulties finding foam, as it was spread in different places, kiddos love to find new spots to stash their craft materials. You can also use card for the bird body really, but since we had leftovers of foam, we chose that material instead of card.


Cutting the materials for the bird body was easy.  I did made the hole on the cork, which is very straightforward to do. The bit that was really difficult for us (particularly for the big kiddo, although he had fun using mummy's tools) was straight the paper clips, and even more difficult to fold these at the correct angles, as you can see below:


In this image big kiddo is trying to shape the crank. He started shaping the angles, and I finished as the best I could. Not the most easier task even for mummy!


This image shows another step, inserting the legs in the birds body. 


The bird final look! A bit different from what it was suppose to look lol

And here is the bird finally attached to the cork:


But the good part is, even if you get clumsy angles or not straight at all legs, the bird still moves, although in a really funny manner!

It really did not matter if we did not managed a perfect bird, but making this little guy kept us busy, and the kiddos still enjoyed playing with it.

 Let's see if I can start posting more regularly. No promises though, as finding some free time with home-schooling is not easy.  I hope this post gets you some inspiration to spend time at home with kids! Share some ideas below, I would love to hear from you.

xx

28 January 2020

Our first birthday party! Space Party!

It has been a while since my last post! And this new post will be very different from my last one. I shared a very personal side of my life... There is so much that I need to share, but bot today.
Today I will be sharing a brighter and lighter side of these past months. It is always a pretty busy holiday season for us,  besides Christmas we have two birthdays to celebrate... That's what happens when both your children are born around Christmas time, one just before and other after Christmas day...!

And today I will be writing about how we planed my oldest birthday party, and how we decided to celebrate birthdays which happen during the Christmas holiday. I do know that there are many blog posts sharing fantastic birthday parties, with extraordinary decorations! And yes, if I had a never ending budget I would love to offer one of those parties to my 6 year old boy... However our budget is limited, and we have to keep our feet grounded and not go crazy -  and  I only managed to do this because of my well grounded partner... I am very addicted to Pinterest and it was incredibly hard for me to keep this party within reasonable, and more practical limits. But it is difficult isn't it? As a parent you want to offer your children all their dreams! I am thinking about this party for a very long time,  my plans concerning the decorations, children's games and entertainments  as well  our party food are thought  far in advance  -over 6 months - so  we would not be stressing about it later. I used to take a quick pick at all sale items in stores as Hobby craft to look for bargains. All the decorations were made by me as well most baking. So the amount of work to do closer to the event had to be planned carefully and with a steady timeline so I would be doing things  with enough time. It helps that my partner was the one grounding me to earth, and reminding me about the time, so I would not loose myself!

But one step at the time! One of my goals was to have both of my children realise that even with the Christmas season their birthdays were important, special and different from our Christmas celebrations. As most children, they were quite excited about Santa Claus' visit. We decorated our home for Christmas and both kiddos helped us out. So, on their birthdays I made a bunting and we had extra large balloons with their age, to mark their birthdays. These days are special, its a celebrations of their birth, of the time they are in our lives and they are treasured. Even if in the midst of  Christmas season, which we all love, these days are so much more cherished!

three


And... back to my my oldest party! We also wanted to offer him a birthday party with all his little friends from school. It would be quite impossible to have a birthday during the holidays, so we planned his birthday party to  happen once school started, during the weekend. Since his birthday is happening during winter time we knew that the party would be happening indoors, ready for any weather. So, we had to rent out a large room with enough space for the children to run freely and able to cope with a large bouncy castle! We searched online for this and rented a large community room close to our home. We did this 3 months prior to the party due date, and we had to move his birthday celebration for a Sunday since our preferred Saturday date was already taken... So lesson learned renting the room have to happen with more time to avoid any disappointments...
His birthday party happened on a Sunday, during the first weekend after school resumed. The invitations were distributed during the last week before Christmas holidays so that the children's parents could rsvp with time. In the end my oldest party had 20 of his little friends attending!


Our party was space thematic, as space and the planets are subjects that our eldest is eager to learn and talk about. Our invitations were made by me, I used Canva for this. And all the little planets and stars that were featuring in the invitation were also used to make a little bunting to hang in the room, by an opening from where the food would be later available. Apologies for the photos as I was so busy on the day I had no time to take any good photos! 


The bouncy castle that we also rented was coordinating with our theme, it featured a few aliens and rocket ships!

I planned for a 2h party, that started from 14h30 until 16h30. I also draw a schedule of the party that I discussed with my partner so we both had a rough idea of how the party should happen. The first 30 to 45 minutes we figured that the kids would be entertained just by jumping and bouncing around! I  planned  for three games to happen and for the children to have enough free play as well - basically having time to play with the bouncy castle. Having a bouncy castle takes care for the kids never ending energy,  and its the centre of all the children attentions, they are immediately drawn to it! So after decreasing a bit of energy with the bouncing castle I started the scheduled games that I had prepared. The first one was my 'Moon rock hunt'.

Moon Rock Hunt 
This was an adaptation of the well know 'Treasure hunt'. I made 20 moon rocks, basically  paper balls wrapped in aluminium paper and hid them around the room. I made 20 moon rocks altogether,  5 yellow moon rocks, 5 green moon rocks and 5 blue rocks (see below).

moon rocks


Previously, whilst the kids were arriving, I gave them 'Space cadets' badges that I also made with Canva, so that the kids were in different teams, yellow, green and blue. 


The blue team should search for yellow moon rocks, green team searches green moon rocks and so on. The general idea behind was to make the search an effort to foster team work and to make it a little bit more difficult. They should be searching for specific moon rocks. I also made some signs that spread oround the room pointing the children to the spots where the moon rocks would be. If planning this seamed easy, practically the minute the kids realised that there were teams, they wanted to be in specific teams! 'I want to be on the blue team'... 'I want to be on x's team'. The minute I started to listen to this I got a little bit panicky! I immediately dropped the teams ideas and quickly said: 'no worries children! If you want to search with x, do it, and search for the colour you want'. Immediately the kids started to run all around the room  searching for the moon rocks! That was the main goal in the end, having them running around  the room actively searching! Not soon after I was surrounded by my many rocks! I quickly counted and there  still two rocks missing! Quickly shouted, 'Kids only two yellow rocks missing! Keep searching!' And they kept searching the room! After finding all the moon rocks there were a few sad voices 'I didn't find any rock' that I had to dispel, 'Its ok, this was a team effort! You were looking for x colour and your team found all of them! There are more games to play, don't be sad.'

Note: with 20 children this game took about 10', with the kids finding 20 moon rocks.

And then its time for my second planned game, 'Land the rocket'!

Land the Rocket 
Land the Rocket is an adaptation of  'pin the tale on the donkey'. I made the game myself reusing old cardboard boxes. I wrapped in space themed wrapping paper a large piece of cardboard. 


I printed a large moon from Canva, as same as the moons that  featuring in the invitations and the paper space bunting and glued in the centre of the cardboard. I then printed about 30 small rocket ships from canva and cut them, attached double sided tape and placed them in an envelope and stick it on a cardboard frame. And this is a picture of the end result, after the kids landed all their rockets!


Note: With 20 children this game took about 30' to finish. Some children were able to land a second rocket.

After this game it was about 16h, and it was time for snacks. The children quickly ate, and after another round with the children freely bouncing in the bouncing castle it was time for the last game, pass the space parcel.

Pass the space parcel
 This was simply the 'pass the parcel game', where the parcel was wrapped in a space themed paper. I wrapped small bags of sweets in wrapping paper, added more bags of sweets and wrapped again repeating the process over and over again. I did this twice, making two large parcels. This was the game that was more difficult for me to manage... I had to pay attention to the children that are very slow to pass the parcel as pay attention to make sure that  the song stops at a time that there's  new kids holding the parcels! Every child has to have a turn at opening the parcel.... And I had to manage two parcels at the same time so that the game would not take ages to end.... I was lucky that a mum that stayed at the party was helping me out at this, she could see that I was having difficulties! I let a kid  open a parcel twice which should be fine if you have loads of turns at 'pass the parcel', .... but we did not have so many sweets to let all the kids have second turns.  All it was fine in the end...The children also step in and started to say who already had a turn!

Note: With 20 children and two parcels, this game took about 20'.

And after this game it was cake time! It was the last event and with this we are pretty much at the end of the party! 

And at this point we barely had time to sing 'Happy birthday' and have the birthday cake! My oldest wanted a chocolate cake, which was great as the chocolate icing would be great as more  space than a featuring little white chocolate stars....


And we are pretty much at the end of the party....!
I was really scared about this first party to be honest... Will the kids have fun? Will they get bored? What can I do? But just the bouncing castle would have been enough... Just bouncing around is great fun for these little guys!
We also handed party favours when the children where leaving the party, a paper bag with light in the dark stars, a space pencil and a space rubber! 


26 August 2019

We have a dollhouse!

Since a young child I always dreamed about having a little dollhouse... Even now, as a grown person I would endlessly stare at the dollhouses at any toy store, imagining which furniture would be better suited, how to rearrange it, daydreaming .... ! 

Recently an opportunity for us to buy a second hand dollhouse showed up locally and we did it, we bought a dollhouse!!! 


As it stands, this dollhouse is in need of loads of tlc, and we all are quite happily to providing it! Since we picked it up from the seller, both myself and kidos are quite happy to open it up, and having little toy figures moving through it! As it stands, the dollhouse is quite empty and cold. Nevertheless,   just its empty walls are providing  happy hours of  play time! 


Apologies for the terrible resolution of these photos. These were taken with my phone and I did not remember to take more pictures...

But, back to my dollhouse plans... I have already very happily sketched plans to how this dollhouse will be revived. It will definitely be a very long term project to 'fix it up', but we are all ( kidos included) contributing to this project.

I have already removed the front opening to give the dollhouse a thorough wash, and left it outdoors to dry. I  also started to sand it as I will be painting it all white. 


The pink colour however lovely it is or better, was, it is not our family's favourite.... particularly not mine! So I intend the house to feature mostly white or neutral tones. These neutral tones not only will be featuring outside as well inside. I also plan to  insert some new windows to have more light coming in, and change the door frames. I want the house to look more modern:


Not only I will be changing the dollhouse's features as I have also draw some plans about the furniture, which will mostly be quite modern. Whilst I searched online about 'modern dollhouse furniture', a whole new world was shown! I was completely stunned by the miniature world that I discovered.... Happily I found that I am not alone in up-doing Dollhouses! There are so many different blogs and Youtube channels featuring tutorials in how to paint, wallpaper and actually building miniature dollhouses and furniture. 

I updated my blog Library to feature these new sources of tutorials.  There is this 'modern dollhouse' world online that I was completely unaware! I was a bit daunted about  how I should venture into this new hobby, but I am not alone in this.... I will present my adventures in this new found hobby of mine as often as possible. This is a long term project, and hopeful I will be posting about my progress often....


01 April 2019

My Monday making: Children's Tee-Pee


I am planning to write this post for a very long time. I can literally say that this post took years to make!
If you follow my Pinterest account, a couple years ago I was mostly pinning tee-pees. I fall deeply in love with a couple of them! After seeing inspired by a few designs I started to sketch my very own tee-pee pattern. I wanted a tee-pee where my kids could actually be standing once inside, which actually does not happen with most designs I was finding. I will be summarising below the best way I can my process of sketching and making my tee-pee. 

Step 1: Sketch your pattern
You will need to carefully design a tee-pee that better fits you needs, weight in the space you have available, and the overall use that you wish to give your tee-pee. Do you want your kids to play with your tee-pee outside? Do you have a lot of space available? Overall the use and size of your tee-pee  will impact the fabrics selection  and how much you will need to purchase.  You don't want  having to return to store and find your fabric gone if you purchase less fabric. Or you don't want to purchase fabric that will not last not even a few hours of play!

The conception of my pattern was not that difficult, particularly as there is a world of tee-pees out there to feed your imagination! I loved this one, also love the gift to illustrate the tee-pee too!  However,  thinking about the assembly and actually sowing and merging the pieces together was! The amount of fabric use is tremendous and actually sowing the pieces together can be quite difficult,  particularly towards the end. Just the sheer amount of fabric is huge!  I also decided to use contrasting fabrics for the tee-pee, so I ended up cutting and sowing together many pieces. The end result is beautiful, but it was very time consuming (adding that I do not use my sowing machine that much!) 


My tee-pee is actually quite high... And can make it higher given that I am using really long dowels so I can slide the tent and make the tee-pee higher, even if I leave empty space closer to the floor.

Step 2: Gather and purchase your materials
The dowels I purchased are the longest I could find, 2,40 meters, with 18mm diameter, I purchased these at my local B&Q store. The fabric selection was my favorite part. Who does not enjoy fabric shopping? My tee-pee was intended to be used both outdoors and indoors, so I knew that the fabric needed to be quite strong, otherwise even if I had a beautiful teepee, it would not last long, particularly if I used cotton fabric. So I chose upholster fabrics from my local Dunelm store. They were having a sale at the time, so I took the chance to buy fabrics at a cheaper price. These were picked by my kids since in the end the tee-pee would be used by them, so I allowed them to choose the fabric pattern. My oldest was at the time in a 'planet and universe' stage so he picked a space themed fabric and a contrasting stary one too. Altogether, between the two different fabrics I purchased around 7m.  I also purchased a lot of white rope. This would be used both for the entrance of my tee-pee as to tie in the dowels in step 4.
Note: If you will use my sketch as a model, you will have to add seem allowance to your measurements.


Step 3: Cut and Sew your tee-pee 
I cut 4 dowels sleeves, 5 large side pieces (2 were the tee-pee entrance, as the picture below shows) and 4 top smaller pieces. I began by sowing together the two pieces of the contrasting fabric for the generic tee-pee side, so I would have a whole side. I did this for the three tee-pee sides. For the entrance I had to sow together three pieces, as two pieces of fabric have to slide open to enter the tee-pee. You could the entrance differently, as a beautiful mess shows.  Its all up to your imagination! For the entrance  I also added a rope that can tie in place the tee-pee entrance, which will keep the entryway open:


After having the sides ready, you have to sew together two sides, alongside the pre-cut dowel sleeve. Before stitching the three pieces using the sowing machine, I cobbled using the actually dowel as a model. You have to make sure that the dowel can actually slide in. Otherwise you may find yourself having to unpick your work when discover that the dowel does not slide in. Yes, that happened to me...


Once you have two sides stitched together, you just add another dowel sleeve plus another side and sow these together. Just keep repeating this process  until you close up the 'tee-pee pyramid'. After just sewing two sides together, the amount of fabric just keeps getting heavier and it can get very difficult to sew.
I also decided to sew a rug for the tee-pee floor and with the fabrics leftovers also made a bunting and a couple of cushions. You can see the final tee-pee with both cushions and bunting below.

Step 4: Assembly your tee-pee
Once you have your tent ready, its just a matter of assembly the dowels and the tent. To assembly the tee-pee you first need to tie the dowels together. I used a lot of rope at this stage. For the knots I looked up for inspiration online. I found this tutorial at wikihow on how to tie the knot and I followed it to secure the dowels in place. I also found that some tutorials recommend to drill the dowels to thread the rope in. I skipped this altogether... It is true that having the rope thread in wholes will keep the rope secured in place, but it's not entirely necessary to be honest. My tee-pee has two years now, and the original knots I made are still in place. I am also opening and closing the tee-pee all the time, as we are using the tee-pee both indoors and outdoors... Even with all the opening and closing it up as an umbrella in the end of the day, the original knots are still there.  I do have to slide up the rope sometimes but thats about it. 


Step 5: Enjoy your tee-pee!
This is better part! Enjoying your work... and seeing how much your kids enjoy the tee-pee you made! They have so much fun just  by placing the tee-pee in place. And then, just by going in and out... Closing the entrance, opening the entrance! 


Iam very proud of my roomy tee-pee.  Even with lots of cushions inside (so its as comfortable as you possibly can make) both kidos fit perfectly inside... Since the dowels are very long, we can make more room inside the tee-pee by pulling the tent a little bit higher. You can fill in the spaces with extra cushions.


The cushions will also add extra comfort when outside.


I love to add the cushions and soft toys to this little tent. Its so very inventing to just lay in inside... Use it for some chill time... And it is a really comfortable spot to do some reading!


Now that the weather is so inviting since the spring finally arrived, we surely will be using the tee-pee outside everyday!
xx


I linked up:

27 June 2016

My Monday Making: My first rag doll


It has been such a long time since I had some relative free time for some creative ventures.... Making a rag-doll it was on my to try list, and finally I made it.

Making this rag-doll was an excellent way to recycle some old t-shirts and fabric leftovers... and have lots of fun at it...!

Firstly I began by searching my fabric stash for cute fabrics for the dress.
I also draw  and cut the doll template from old newspapers:


I began by making the doll’s head:


For the doll’s head I used an old t-shirt fabric  for the face and felt for the hair. I created a pattern for the hair, and cut the felt for both front and back of the doll’s hair. I stitch the 'back hair 'together so it would look as side pigtails. I basted the front and back hair on the previous cut t-shirt following the pattern I made for the head.  I embroidered the front hair and then I saw both back and front together. Once stitched, I  then stuffed the head  and embroidered the doll’s eyes, nose and mouth.

Then I made the doll’s body...


Afterwards it was time to make a dress:


O also made some bows as hair pins.

I had so much fun creating and making this doll. As a little kid I always wanted a rag doll but never had one... I guess I am fulfilling  this as a grownup,  but better since I made it from scratch. I will later share the doll’s pattern for you to download.
Here’s another picture of the doll, although without having embroidered the mouth. I was undecided about how to make the little mouth, or even it should have one altogether...


In the end I eventually embroidered one...


I linked up with:
Related Posts Plugin for WordPress, Blogger...